dyld简介
dyld(the dynamic link editor)是苹果的动态链接器,是苹果操作系统一个重要组成部分,在系统内核做好程序准备工作之后,交由dyld负责余下的工作。而且它是开源的,任何人可以通过苹果官网下载它的源码来阅读理解它的运作方式,了解系统加载动态库的细节。
dyld下载地址:http://opensource.apple.com/tarballs/dyld。笔者下载的是519.2.2版本。
共享缓存机制
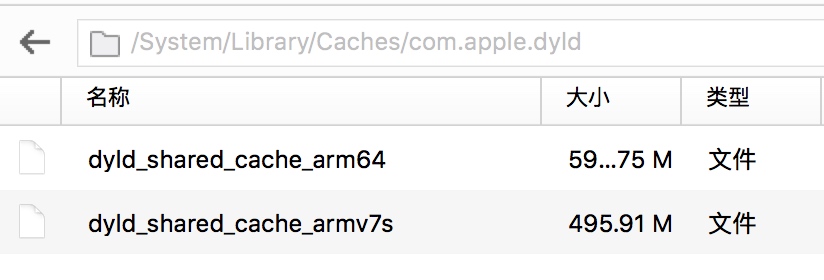
在iOS系统中,每个程序依赖的动态库都需要通过dyld(位于/usr/lib/dyld)一个一个加载到内存,然而,很多系统库几乎是每个程序都会用到的,如果在每个程序运行的时候都重复的去加载一次,势必造成运行缓慢,为了优化启动速度和提高程序性能,共享缓存机制就应运而生。所有默认的动态链接库被合并成一个大的缓存文件,放到/System/Library/Caches/com.apple.dyld/目录下,按不同的架构保存分别保存着,笔者的iPhone6里面就有dyld_shared_cache_armv7s和dyld_shared_cache_armv64两个文件,如下图所示。

想要分析某个系统库,就需要从dyld_shared_cache里先将的原始二进制文件提取出来,这里从易到难提供3种方法:
1. dyld_cache_extract提取
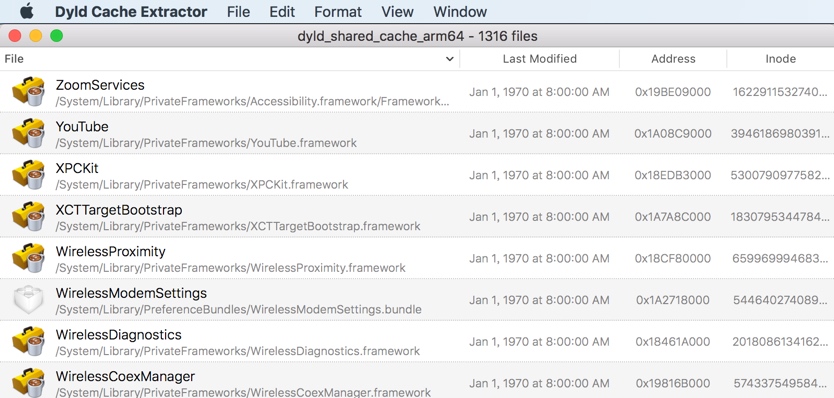
dyld_cache_extract(https://github.com/macmade/dyld_cache_extract)是一个可视化的工具,使用极其简单,把dyld_shared_cache载入即可解析出来,如下图所示。

2. jtool提取
以提取CFNetwork为例,使用如下命令即可:
$ jtool -extract CFNetwork ./dyld_shared_cache_arm64
Extracting /System/Library/Frameworks/CFNetwork.framework/CFNetwork at 0x147a000 into dyld_shared_cache_arm64.CFNetwork
3. dsc_extractor提取
在dyld源代码的launch-cache文件夹里面找到dsc_extractor.cpp,将653行的“#if 0”修改为“#if 1”,然后用如下命令编译生成dsc_extractor,并使用它提取所有缓存文件:
$ clang++ dsc_extractor.cpp dsc_iterator.cpp  -o dsc_extractor
$ ./dsc_extractor ./dyld_shared_cache_arm64 ./
dyld加载过程
一个iOS程序的main()函数位于main.m中,这是我们熟知的程序入口。但很少有人去关心main()函数之前到底发生了什么。本章就带着这个疑问,从main()函数入手,探索一下dyld的加载过程。
先用Xcode新建一个Single View App工程,并在main()函数下断,然后运行,调用栈如下图所示。
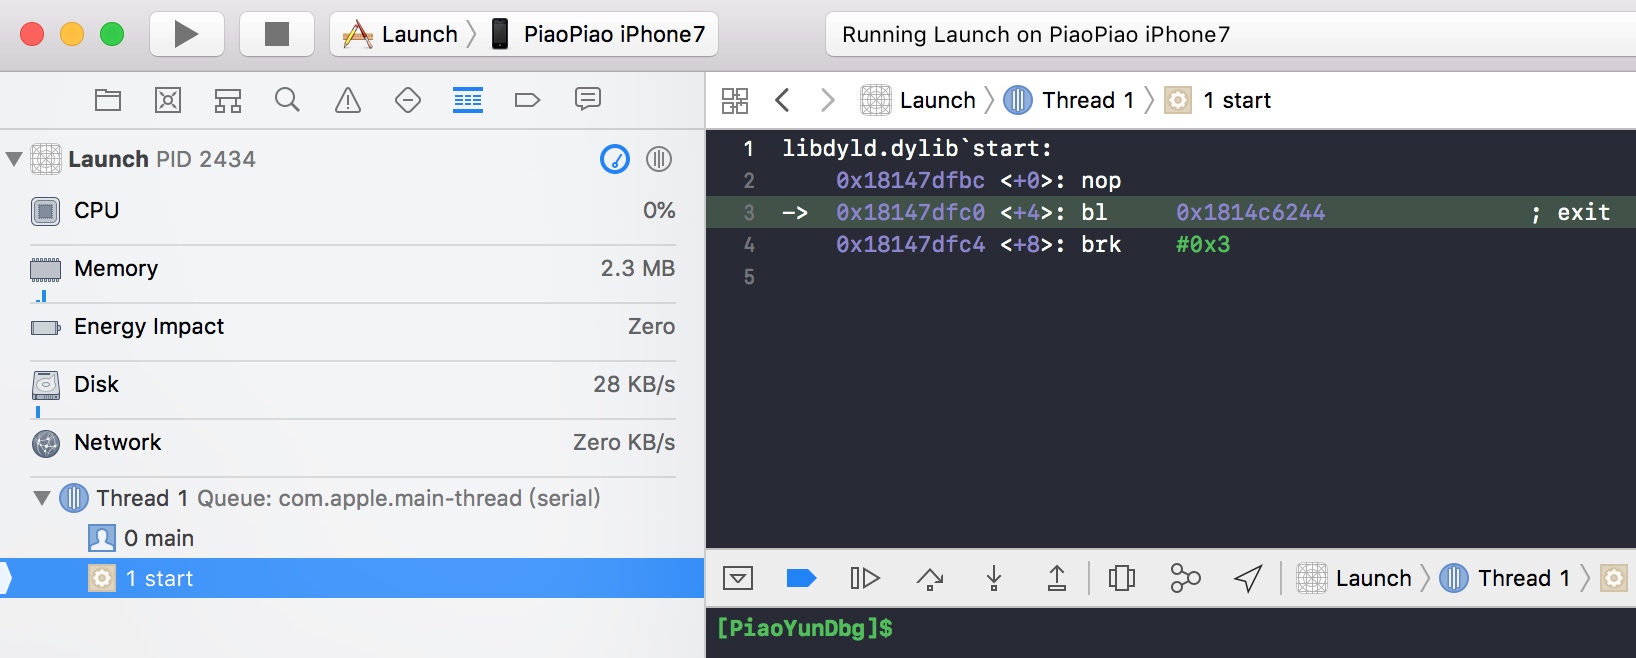 

main()函数之前仅有一个libdyld.dylib`start入口,这显然不是我们想要的,根据这个线索顺藤摸瓜,在dyld源代码dyldStartup.s中找到了__dyld_start函数,此函数由汇编实现,兼容各种平台架构,此处仅摘录arm64架构下的汇编代码片段:
#if __arm64__
    .data
    .align 3
__dso_static:
    .quad   ___dso_handle

    .text
    .align 2
    .globl __dyld_start
__dyld_start:
    mov     x28, sp
    and     sp, x28, #~15       // force 16-byte alignment of stack
    mov x0, #0
    mov x1, #0
    stp x1, x0, [sp, #-16]! // make aligned terminating frame
    mov fp, sp          // set up fp to point to terminating frame
    sub sp, sp, #16             // make room for local variables
    ldr     x0, [x28]       // get app's mh into x0
    ldr     x1, [x28, #8]           // get argc into x1 (kernel passes 32-bit int argc as 64-bits on stack to keep alignment)
    add     x2, x28, #16        // get argv into x2
    adrp    x4,___dso_handle@page
    add     x4,x4,___dso_handle@pageoff // get dyld's mh in to x4
    adrp    x3,__dso_static@page
    ldr     x3,[x3,__dso_static@pageoff] // get unslid start of dyld
    sub     x3,x4,x3        // x3 now has slide of dyld
    mov x5,sp                   // x5 has &startGlue

    // call dyldbootstrap::start(app_mh, argc, argv, slide, dyld_mh, &startGlue)
    bl  __ZN13dyldbootstrap5startEPK12macho_headeriPPKclS2_Pm
    mov x16,x0                  // save entry point address in x16
    ldr     x1, [sp]
    cmp x1, #0
    b.ne    Lnew

    // LC_UNIXTHREAD way, clean up stack and jump to result
    add sp, x28, #8     // restore unaligned stack pointer without app mh
    br  x16         // jump to the program's entry point

    // LC_MAIN case, set up stack for call to main()
Lnew:   mov lr, x1          // simulate return address into _start in libdyld.dylib
    ldr     x0, [x28, #8]       // main param1 = argc
    add     x1, x28, #16        // main param2 = argv
    add x2, x1, x0, lsl #3
    add x2, x2, #8      // main param3 = &env[0]
    mov x3, x2
Lapple: ldr x4, [x3]
    add x3, x3, #8
    cmp x4, #0
    b.ne    Lapple          // main param4 = apple
    br  x16

#endif // __arm64__
源码中可以看到一条bl命令,根据注释可以知道是跳转到dyldbootstrap::start()函数:
// call dyldbootstrap::start(app_mh, argc, argv, slide, dyld_mh, &startGlue)
bl  __ZN13dyldbootstrap5startEPK12macho_headeriPPKclS2_Pm
dyldbootstrap::start()函数中做了很多dyld初始化相关的工作,包括:
- rebaseDyld() dyld重定位。
- mach_init() mach消息初始化。
- __guard_setup() 栈溢出保护。
初始化工作完成后,此函数调用到了dyld::_main(),再将返回值传递给__dyld_start去调用真正的main()函数。在dyldInitialization.cpp文件中可以找到dyldbootstrap::start()函数的实现如下:
//
//  This is code to bootstrap dyld.  This work in normally done for a program by dyld and crt.
//  In dyld we have to do this manually.
//
uintptr_t start(const struct macho_header* appsMachHeader, int argc, const char* argv[],
                intptr_t slide, const struct macho_header* dyldsMachHeader,
                uintptr_t* startGlue)
{
    // if kernel had to slide dyld, we need to fix up load sensitive locations
    // we have to do this before using any global variables
    if ( slide != 0 ) {
     // dyld重定位
        rebaseDyld(dyldsMachHeader, slide);
    }

    // allow dyld to use mach messaging
    // mach消息初始化
    mach_init();

    // kernel sets up env pointer to be just past end of agv array
    const char** envp = &argv[argc+1];

    // kernel sets up apple pointer to be just past end of envp array
    const char** apple = envp;
    while(*apple != NULL) { ++apple; }
    ++apple;

    // set up random value for stack canary
    // 栈溢出保护
    __guard_setup(apple);

    // now that we are done bootstrapping dyld, call dyld's main
    uintptr_t appsSlide = slideOfMainExecutable(appsMachHeader);
    // 进入dyld::_main()函数
    return dyld::_main(appsMachHeader, appsSlide, argc, argv, envp, apple, startGlue);
}
dyld::_main()是整个App启动的关键函数,此函数里面做了很多事情,代码如下:
//
// Entry point for dyld.  The kernel loads dyld and jumps to __dyld_start which
// sets up some registers and call this function.
//
// Returns address of main() in target program which __dyld_start jumps to
//
uintptr_t
_main(const macho_header* mainExecutableMH, uintptr_t mainExecutableSlide,
        int argc, const char* argv[], const char* envp[], const char* apple[],
        uintptr_t* startGlue)
{
    // Grab the cdHash of the main executable from the environment
    // 第一步,设置运行环境
    uint8_t mainExecutableCDHashBuffer[20];
    const uint8_t* mainExecutableCDHash = nullptr;
    if ( hexToBytes(_simple_getenv(apple, "executable_cdhash"), 40, mainExecutableCDHashBuffer) )
        // 获取主程序的hash
        mainExecutableCDHash = mainExecutableCDHashBuffer;

    // Trace dyld's load
    notifyKernelAboutImage((macho_header*)&__dso_handle, _simple_getenv(apple, "dyld_file"));
#if !TARGET_IPHONE_SIMULATOR
    // Trace the main executable's load
    notifyKernelAboutImage(mainExecutableMH, _simple_getenv(apple, "executable_file"));
#endif

    uintptr_t result = 0;
    // 获取主程序的macho_header结构
    sMainExecutableMachHeader = mainExecutableMH;
    // 获取主程序的slide值
    sMainExecutableSlide = mainExecutableSlide;

    CRSetCrashLogMessage("dyld: launch started");
    // 设置上下文信息
    setContext(mainExecutableMH, argc, argv, envp, apple);

    // Pickup the pointer to the exec path.
    // 获取主程序路径
    sExecPath = _simple_getenv(apple, "executable_path");

    // <rdar://problem/13868260> Remove interim apple[0] transition code from dyld
    if (!sExecPath) sExecPath = apple[0];

    if ( sExecPath[0] != '/' ) {
        // have relative path, use cwd to make absolute
        char cwdbuff[MAXPATHLEN];
        if ( getcwd(cwdbuff, MAXPATHLEN) != NULL ) {
            // maybe use static buffer to avoid calling malloc so early...
            char* s = new char[strlen(cwdbuff) + strlen(sExecPath) + 2];
            strcpy(s, cwdbuff);
            strcat(s, "/");
            strcat(s, sExecPath);
            sExecPath = s;
        }
    }

    // Remember short name of process for later logging
    // 获取进程名称
    sExecShortName = ::strrchr(sExecPath, '/');
    if ( sExecShortName != NULL )
        ++sExecShortName;
    else
        sExecShortName = sExecPath;

    // 配置进程受限模式
    configureProcessRestrictions(mainExecutableMH);


    // 检测环境变量
    checkEnvironmentVariables(envp);
    defaultUninitializedFallbackPaths(envp);

    // 如果设置了DYLD_PRINT_OPTS则调用printOptions()打印参数
    if ( sEnv.DYLD_PRINT_OPTS )
        printOptions(argv);
    // 如果设置了DYLD_PRINT_ENV则调用printEnvironmentVariables()打印环境变量
    if ( sEnv.DYLD_PRINT_ENV )
        printEnvironmentVariables(envp);
    // 获取当前程序架构
    getHostInfo(mainExecutableMH, mainExecutableSlide);
    //-------------第一步结束-------------

    // load shared cache
    // 第二步,加载共享缓存
    // 检查共享缓存是否开启,iOS必须开启
    checkSharedRegionDisable((mach_header*)mainExecutableMH);
    if ( gLinkContext.sharedRegionMode != ImageLoader::kDontUseSharedRegion ) {
        mapSharedCache();
    }
    ...

    try {
        // add dyld itself to UUID list
        addDyldImageToUUIDList();

        // instantiate ImageLoader for main executable
        // 第三步 实例化主程序
        sMainExecutable = instantiateFromLoadedImage(mainExecutableMH, mainExecutableSlide, sExecPath);
        gLinkContext.mainExecutable = sMainExecutable;
        gLinkContext.mainExecutableCodeSigned = hasCodeSignatureLoadCommand(mainExecutableMH);

        // Now that shared cache is loaded, setup an versioned dylib overrides
    #if SUPPORT_VERSIONED_PATHS
        checkVersionedPaths();
    #endif


        // dyld_all_image_infos image list does not contain dyld
        // add it as dyldPath field in dyld_all_image_infos
        // for simulator, dyld_sim is in image list, need host dyld added
#if TARGET_IPHONE_SIMULATOR
        // get path of host dyld from table of syscall vectors in host dyld
        void* addressInDyld = gSyscallHelpers;
#else
        // get path of dyld itself
        void*  addressInDyld = (void*)&__dso_handle;
#endif
        char dyldPathBuffer[MAXPATHLEN+1];
        int len = proc_regionfilename(getpid(), (uint64_t)(long)addressInDyld, dyldPathBuffer, MAXPATHLEN);
        if ( len > 0 ) {
            dyldPathBuffer[len] = '\0'; // proc_regionfilename() does not zero terminate returned string
            if ( strcmp(dyldPathBuffer, gProcessInfo->dyldPath) != 0 )
                gProcessInfo->dyldPath = strdup(dyldPathBuffer);
        }

        // load any inserted libraries
        // 第四步 加载插入的动态库
        if  ( sEnv.DYLD_INSERT_LIBRARIES != NULL ) {
            for (const char* const* lib = sEnv.DYLD_INSERT_LIBRARIES; *lib != NULL; ++lib)
                loadInsertedDylib(*lib);
        }
        // record count of inserted libraries so that a flat search will look at
        // inserted libraries, then main, then others.
        // 记录插入的动态库数量
        sInsertedDylibCount = sAllImages.size()-1;

        // link main executable
        // 第五步 链接主程序
        gLinkContext.linkingMainExecutable = true;
#if SUPPORT_ACCELERATE_TABLES
        if ( mainExcutableAlreadyRebased ) {
            // previous link() on main executable has already adjusted its internal pointers for ASLR
            // work around that by rebasing by inverse amount
            sMainExecutable->rebase(gLinkContext, -mainExecutableSlide);
        }
#endif
        link(sMainExecutable, sEnv.DYLD_BIND_AT_LAUNCH, true, ImageLoader::RPathChain(NULL, NULL), -1);
        sMainExecutable->setNeverUnloadRecursive();
        if ( sMainExecutable->forceFlat() ) {
            gLinkContext.bindFlat = true;
            gLinkContext.prebindUsage = ImageLoader::kUseNoPrebinding;
        }

        // link any inserted libraries
        // do this after linking main executable so that any dylibs pulled in by inserted
        // dylibs (e.g. libSystem) will not be in front of dylibs the program uses
        // 第六步 链接插入的动态库
        if ( sInsertedDylibCount > 0 ) {
            for(unsigned int i=0; i < sInsertedDylibCount; ++i) {
                ImageLoader* image = sAllImages[i+1];
                link(image, sEnv.DYLD_BIND_AT_LAUNCH, true, ImageLoader::RPathChain(NULL, NULL), -1);
                image->setNeverUnloadRecursive();
            }
            // only INSERTED libraries can interpose
            // register interposing info after all inserted libraries are bound so chaining works
            for(unsigned int i=0; i < sInsertedDylibCount; ++i) {
                ImageLoader* image = sAllImages[i+1];
                image->registerInterposing();
            }
        }

        // <rdar://problem/19315404> dyld should support interposition even without DYLD_INSERT_LIBRARIES
        for (long i=sInsertedDylibCount+1; i < sAllImages.size(); ++i) {
            ImageLoader* image = sAllImages[i];
            if ( image->inSharedCache() )
                continue;
            image->registerInterposing();
        }
        ...

        // apply interposing to initial set of images
        for(int i=0; i < sImageRoots.size(); ++i) {
            sImageRoots[i]->applyInterposing(gLinkContext);
        }
        gLinkContext.linkingMainExecutable = false;

        // <rdar://problem/12186933> do weak binding only after all inserted images linked
        // 第七步 执行弱符号绑定
        sMainExecutable->weakBind(gLinkContext);

        // If cache has branch island dylibs, tell debugger about them
        if ( (sSharedCacheLoadInfo.loadAddress != NULL) && (sSharedCacheLoadInfo.loadAddress->header.mappingOffset >= 0x78) && (sSharedCacheLoadInfo.loadAddress->header.branchPoolsOffset != 0) ) {
            uint32_t count = sSharedCacheLoadInfo.loadAddress->header.branchPoolsCount;
            dyld_image_info info[count];
            const uint64_t* poolAddress = (uint64_t*)((char*)sSharedCacheLoadInfo.loadAddress + sSharedCacheLoadInfo.loadAddress->header.branchPoolsOffset);
            // <rdar://problem/20799203> empty branch pools can be in development cache
            if ( ((mach_header*)poolAddress)->magic == sMainExecutableMachHeader->magic ) {
                for (int poolIndex=0; poolIndex < count; ++poolIndex) {
                    uint64_t poolAddr = poolAddress[poolIndex] + sSharedCacheLoadInfo.slide;
                    info[poolIndex].imageLoadAddress = (mach_header*)(long)poolAddr;
                    info[poolIndex].imageFilePath = "dyld_shared_cache_branch_islands";
                    info[poolIndex].imageFileModDate = 0;
                }
                // add to all_images list
                addImagesToAllImages(count, info);
                // tell gdb about new branch island images
                gProcessInfo->notification(dyld_image_adding, count, info);
            }
        }

        CRSetCrashLogMessage("dyld: launch, running initializers");
        ...
        // run all initializers
        // 第八步 执行初始化方法
        initializeMainExecutable();

        // notify any montoring proccesses that this process is about to enter main()
        dyld3::kdebug_trace_dyld_signpost(DBG_DYLD_SIGNPOST_START_MAIN_DYLD2, 0, 0);
        notifyMonitoringDyldMain();

        // find entry point for main executable
        // 第九步 查找入口点并返回
        result = (uintptr_t)sMainExecutable->getThreadPC();
        if ( result != 0 ) {
            // main executable uses LC_MAIN, needs to return to glue in libdyld.dylib
            if ( (gLibSystemHelpers != NULL) && (gLibSystemHelpers->version >= 9) )
                *startGlue = (uintptr_t)gLibSystemHelpers->startGlueToCallExit;
            else
                halt("libdyld.dylib support not present for LC_MAIN");
        }
        else {
            // main executable uses LC_UNIXTHREAD, dyld needs to let "start" in program set up for main()
            result = (uintptr_t)sMainExecutable->getMain();
            *startGlue = 0;
        }
    }
    catch(const char* message) {
        syncAllImages();
        halt(message);
    }
    catch(...) {
        dyld::log("dyld: launch failed\n");
    }
    ...

    return result;
}
笔者对上面比较重要的地方加了一些注释,方便读者查看。整个加载过程可细分为九步:
- 第一步:设置运行环境。
- 第二步:加载共享缓存。
- 第三步:实例化主程序。
- 第四步:加载插入的动态库。
- 第五步:链接主程序。
- 第六步:链接插入的动态库。
- 第七步:执行弱符号绑定
- 第八步:执行初始化方法。
- 第九步:查找入口点并返回。
设置运行环境
这一步主要是设置运行参数、环境变量等。代码在开始的时候,将入参mainExecutableMH赋值给了sMainExecutableMachHeader,这是一个macho_header结构体,表示的是当前主程序的Mach-O头部信息,加载器依据Mach-O头部信息就可以解析整个Mach-O文件信息。接着调用setContext()设置上下文信息,包括一些回调函数、参数、标志信息等。设置的回调函数都是dyld模块自身实现的,如loadLibrary()函数实际调用的是libraryLocator(),负责加载动态库。代码片断如下:
static void setContext(const macho_header* mainExecutableMH, int argc, const char* argv[], const char* envp[], const char* apple[])
{
   gLinkContext.loadLibrary         = &libraryLocator;
   gLinkContext.terminationRecorder = &terminationRecorder;
   ...
}
configureProcessRestrictions()用来配置进程是否受限,代码逻辑比较简单,sEnvMode默认等于envNone(即受限模式),如果设置了get_task_allow权限或者是内核开发时会设置成envAll,如果设置了uid和gid则立即变成受限模式,代码片段如下:
static void configureProcessRestrictions(const macho_header* mainExecutableMH)
{
    sEnvMode = envNone; // 受限模式
    gLinkContext.requireCodeSignature = true; // 需要代码签名
    uint32_t flags;
    if ( csops(0, CS_OPS_STATUS, &flags, sizeof(flags)) != -1 ) {
        // 启用代码签名
        if ( flags & CS_ENFORCEMENT ) {
            // get_task_allow
            if ( flags & CS_GET_TASK_ALLOW ) {
                // Xcode built app for Debug allowed to use DYLD_* variables
                // Xcode调试时允许使用DYLD_*环境变量
                sEnvMode = envAll; // 非受限模式
            }
            else {
                // Development kernel can use DYLD_PRINT_* variables on any FairPlay encrypted app
                uint32_t secureValue = 0;
                size_t   secureValueSize = sizeof(secureValue);
                if ( (sysctlbyname("kern.secure_kernel", &secureValue, &secureValueSize, NULL, 0) == 0) && (secureValue == 0) && isFairPlayEncrypted(mainExecutableMH) ) {
                    sEnvMode = envPrintOnly;
                }
            }
        }
        else {
            // Development kernel can run unsigned code
            // 内核开发运行运行非签名代码
            sEnvMode = envAll; // 非受限模式
            gLinkContext.requireCodeSignature = false; // 无需代码签名
        }
    }
    // 如果设置了uid、gid则变成受限模式
    if ( issetugid() ) {
        sEnvMode = envNone;
    }
}
checkEnvironmentVariables()检测环境变量,如果sEnvMode为envNone就直接返回,否则调用processDyldEnvironmentVariable()处理并设置环境变量,代码如下:
static void checkEnvironmentVariables(const char* envp[])
{
   if ( sEnvMode == envNone )
      return;
   const char** p;
   for(p = envp; *p != NULL; p++) {
      const char* keyEqualsValue = *p;
       if ( strncmp(keyEqualsValue, "DYLD_", 5) == 0 ) {
         const char* equals = strchr(keyEqualsValue, '=');
         if ( equals != NULL ) {
            strlcat(sLoadingCrashMessage, "\n", sizeof(sLoadingCrashMessage));
            strlcat(sLoadingCrashMessage, keyEqualsValue, sizeof(sLoadingCrashMessage));
            const char* value = &equals[1];
            const size_t keyLen = equals-keyEqualsValue;
            char key[keyLen+1];
            strncpy(key, keyEqualsValue, keyLen);
            key[keyLen] = '\0';
            if ( (sEnvMode == envPrintOnly) && (strncmp(key, "DYLD_PRINT_", 11) != 0) )
               continue;
            // 处理并设置环境变量
            processDyldEnvironmentVariable(key, value, NULL);
         }
      }
      else if ( strncmp(keyEqualsValue, "LD_LIBRARY_PATH=", 16) == 0 ) {
         const char* path = &keyEqualsValue[16];
         sEnv.LD_LIBRARY_PATH = parseColonList(path, NULL);
      }
   }
   ...
}
最后是调用getHostInfo()获取当前程序架构,至此,第一步的准备工作就完成了。
细心的读者可能会注意到,整个过程中有一些DYLD_*开头的环境变量,比如:
    // 如果设置了DYLD_PRINT_OPTS则调用printOptions()打印参数
    if ( sEnv.DYLD_PRINT_OPTS )
        printOptions(argv);
    // 如果设置了DYLD_PRINT_ENV则调用printEnvironmentVariables()打印环境变量
    if ( sEnv.DYLD_PRINT_ENV )
        printEnvironmentVariables(envp);
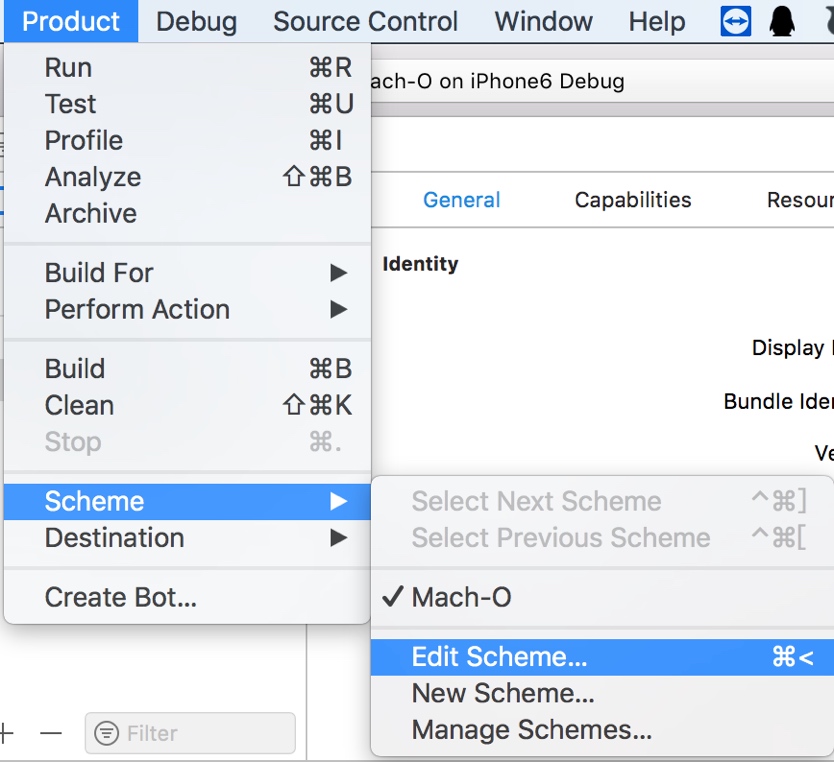
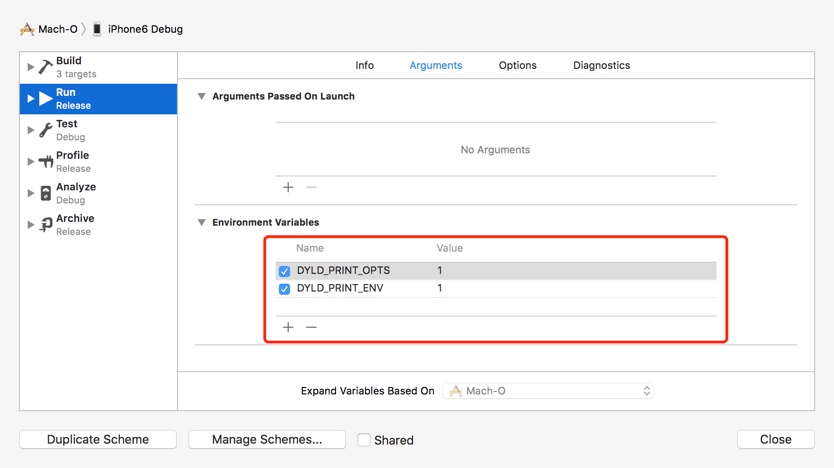
其实,只要在Xcode中配置一下即可让这些环境变量生效,我们随便打开个工程然后依次点击“Product”->“Scheme”->“Edit Scheme…”,如下图所示。

在接下来的页面中,点击“Arguments”选项卡,按下图所示添加环境变量并设置“Value”为1。

运行Xcode即可看到控制台打印的详细信息:
opt[0] = "/var/mobile/Containers/Bundle/Application/B64DB1D3-AD29-4F47-9C77-97B40079E276/Launch.app/Launch"
TMPDIR=/private/var/mobile/Containers/Data/Application/F5D83A13-1C1B-48B7-9764-356C1E1A6764/tmp
__CF_USER_TEXT_ENCODING=0x1F5:0:0
SHELL=/bin/sh
SQLITE_ENABLE_THREAD_ASSERTIONS=1
OS_ACTIVITY_DT_MODE=YES
HOME=/private/var/mobile/Containers/Data/Application/F5D83A13-1C1B-48B7-9764-356C1E1A6764
CFFIXED_USER_HOME=/private/var/mobile/Containers/Data/Application/F5D83A13-1C1B-48B7-9764-356C1E1A6764
FBSClientLogging=0
NSUnbufferedIO=YES
PATH=/usr/bin:/bin:/usr/sbin:/sbin
LOGNAME=mobile
XPC_SERVICE_NAME=UIKitApplication:com.chinapyg.Launch1[0x6e2d]
DYLD_INSERT_LIBRARIES=/Library/MobileSubstrate/MobileSubstrate.dylib:/Developer/usr/lib/libBacktraceRecording.dylib:/Developer/Library/PrivateFrameworks/DTDDISupport.framework/libViewDebuggerSupport.dylib
CLASSIC=0
CFLOG_FORCE_STDERR=YES
DYLD_PRINT_OPTS=1
DYLD_PRINT_ENV=1
USER=mobile
_MSSafeMode=0
XPC_FLAGS=0x1
DYLD_LIBRARY_PATH=/usr/lib/system/introspection
后面还有很多这样的DYLD_*开头的环境变量,感兴趣的读者可以自行测试,笔者不再逐一演示。
加载共享缓存
这一步先调用checkSharedRegionDisable()检查共享缓存是否禁用。该函数的iOS实现部分仅有一句注释,从注释我们可以推断iOS必须开启共享缓存才能正常工作,代码如下:
static void checkSharedRegionDisable(const mach_header* mainExecutableMH)
{
   // iOS cannot run without shared region
}
接下来调用mapSharedCache()加载共享缓存,而mapSharedCache()里面实则是调用了loadDyldCache(),从代码可以看出,共享缓存加载又分为三种情况:
- 仅加载到当前进程,调用mapCachePrivate()。
- 共享缓存已加载,不做任何处理。
- 当前进程首次加载共享缓存,调用mapCacheSystemWide()。
loadDyldCache()的实现代码如下:
bool loadDyldCache(const SharedCacheOptions& options, SharedCacheLoadInfo* results)
{
    results->loadAddress        = 0;
    results->slide              = 0;
    results->cachedDylibsGroup  = nullptr;
    results->errorMessage       = nullptr;

    if ( options.forcePrivate ) {
        // mmap cache into this process only
        // 仅加载到当前进程
        return mapCachePrivate(options, results);
    }
    else {
        // fast path: when cache is already mapped into shared region
        // 共享缓存已加载,不做任何处理
        if ( reuseExistingCache(options, results) )
            return (results->errorMessage != nullptr);

        // slow path: this is first process to load cache
        // 当前进程首次加载共享缓存
        return mapCacheSystemWide(options, results);
    }
}
mapCachePrivate()、mapCacheSystemWide()里面就是具体的共享缓存解析逻辑,感兴趣的读者可以详细分析。
实例化主程序
这一步将主程序的Mach-O加载进内存,并实例化一个ImageLoader。instantiateFromLoadedImage()首先调用isCompatibleMachO()检测Mach-O头部的magic、cputype、cpusubtype等相关属性,判断Mach-O文件的兼容性,如果兼容性满足,则调用ImageLoaderMachO::instantiateMainExecutable()实例化主程序的ImageLoader,代码如下:
static ImageLoaderMachO* instantiateFromLoadedImage(const macho_header* mh, uintptr_t slide, const char* path)
{
  // try mach-o loader
  // 尝试加载MachO
  if ( isCompatibleMachO((const uint8_t*)mh, path) ) {
    ImageLoader* image = ImageLoaderMachO::instantiateMainExecutable(mh, slide, path, gLinkContext);
    addImage(image);
    return (ImageLoaderMachO*)image;
  }

  throw "main executable not a known format";
}
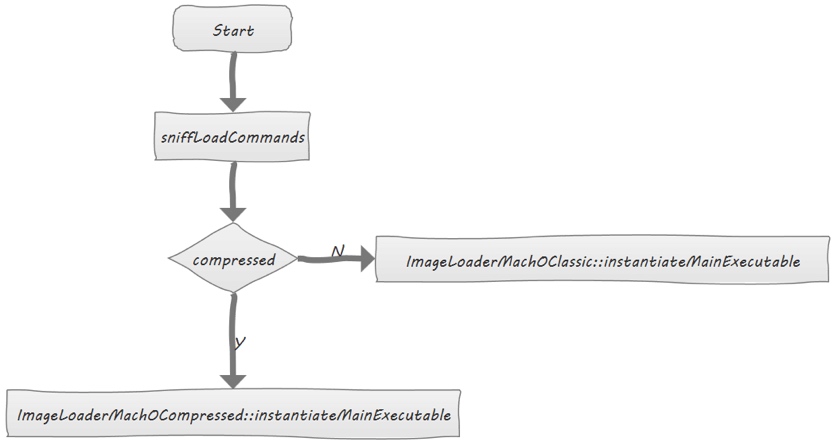
ImageLoaderMachO::instantiateMainExecutable()函数里面首先会调用sniffLoadCommands()函数来获取一些数据,包括:
compressed:若Mach-O存在LC_DYLD_INFO和LC_DYLD_INFO_ONLY加载命令,则说明是压缩类型的Mach-O,代码片段如下:
switch (cmd->cmd) {
case LC_DYLD_INFO:

case LC_DYLD_INFO_ONLY:

    if ( cmd->cmdsize != sizeof(dyld_info_command) )

        throw "malformed mach-o image: LC_DYLD_INFO size wrong";

    dyldInfoCmd = (struct dyld_info_command*)cmd;

    // 存在LC_DYLD_INFO或者LC_DYLD_INFO_ONLY则表示是压缩类型的Mach-O

    *compressed = true;

    break;

    ...

}
segCount:根据 LC_SEGMENT_COMMAND 加载命令来统计段数量,这里抛出的错误日志也说明了段的数量是不能超过255个,代码片段如下:
case LC_SEGMENT_COMMAND:
    segCmd = (struct macho_segment_command*)cmd;

...

    if ( segCmd->vmsize != 0 )

        *segCount += 1;

if ( *segCount > 255 )

    dyld::throwf("malformed mach-o image: more than 255 segments in %s", path);
libCount:根据 LC_LOAD_DYLIB、LC_LOAD_WEAK_DYLIB、LC_REEXPORT_DYLIB、LC_LOAD_UPWARD_DYLIB 这几个加载命令来统计库的数量,库的数量不能超过4095个。代码片段如下:
case LC_LOAD_DYLIB:
case LC_LOAD_WEAK_DYLIB:

case LC_REEXPORT_DYLIB:

case LC_LOAD_UPWARD_DYLIB:

*libCount += 1;

if ( *libCount > 4095 )

    dyld::throwf("malformed mach-o image: more than 4095 dependent libraries in %s", path);
codeSigCmd:通过解析LC_CODE_SIGNATURE来获取代码签名加载命令,代码片段如下:
case LC_CODE_SIGNATURE:
*codeSigCmd = (struct linkedit_data_command*)cmd;

break;
encryptCmd:通过LC_ENCRYPTION_INFO和LC_ENCRYPTION_INFO_64来获取段的加密信息,代码片段如下:
case LC_ENCRYPTION_INFO:
...

*encryptCmd = (encryption_info_command*)cmd;

break;

case LC_ENCRYPTION_INFO_64:

...

*encryptCmd = (encryption_info_command*)cmd;

break;
ImageLoader是抽象类,其子类负责把Mach-O文件实例化为image,当sniffLoadCommands()解析完以后,根据compressed的值来决定调用哪个子类进行实例化,代码如下:
ImageLoader* ImageLoaderMachO::instantiateMainExecutable(const macho_header* mh, uintptr_t slide, const char* path, const LinkContext& context)
{
  bool compressed;
  unsigned int segCount;
  unsigned int libCount;
  const linkedit_data_command* codeSigCmd;
  const encryption_info_command* encryptCmd;
  sniffLoadCommands(mh, path, false, &compressed, &segCount, &libCount, context, &codeSigCmd, &encryptCmd);
  // instantiate concrete class based on content of load commands
  if ( compressed )
    return ImageLoaderMachOCompressed::instantiateMainExecutable(mh, slide, path, segCount, libCount, context);
  else
#if SUPPORT_CLASSIC_MACHO
    return ImageLoaderMachOClassic::instantiateMainExecutable(mh, slide, path, segCount, libCount, context);
#else
    throw "missing LC_DYLD_INFO load command";
#endif
}
此过程可以用下图来进行直观描述。

下面以ImageLoaderMachOCompressed::instantiateMainExecutable()为例来看一下实现:
// create image for main executable
ImageLoaderMachOCompressed* ImageLoaderMachOCompressed::instantiateMainExecutable(const macho_header* mh, uintptr_t slide, const char* path,
                                    unsigned int segCount, unsigned int libCount, const LinkContext& context)
{
  ImageLoaderMachOCompressed* image = ImageLoaderMachOCompressed::instantiateStart(mh, path, segCount, libCount);

  // set slide for PIE programs
  image->setSlide(slide);

  // for PIE record end of program, to know where to start loading dylibs
  if ( slide != 0 )
    fgNextPIEDylibAddress = (uintptr_t)image->getEnd();

  image->disableCoverageCheck();
  image->instantiateFinish(context);
  image->setMapped(context);

  if ( context.verboseMapping ) {
    dyld::log("dyld: Main executable mapped %s\n", path);
    for(unsigned int i=0, e=image->segmentCount(); i < e; ++i) {
      const char* name = image->segName(i);
      if ( (strcmp(name, "__PAGEZERO") == 0) || (strcmp(name, "__UNIXSTACK") == 0)  )
        dyld::log("%18s at 0x%08lX->0x%08lX\n", name, image->segPreferredLoadAddress(i), image->segPreferredLoadAddress(i)+image->segSize(i));
      else
        dyld::log("%18s at 0x%08lX->0x%08lX\n", name, image->segActualLoadAddress(i), image->segActualEndAddress(i));
    }
  }

  return image;
}
这里总结为4步:
- ImageLoaderMachOCompressed::instantiateStart()创建ImageLoaderMachOCompressed对象。
- image->disableCoverageCheck()禁用段覆盖检测。
- image->instantiateFinish()首先调用parseLoadCmds()解析加载命令,然后调用this->setDyldInfo()设置动态库链接信息,最后调用this->setSymbolTableInfo() 设置符号表相关信息,代码片段如下:
- image->setMapped()函数注册通知回调、计算执行时间等等。
在调用完ImageLoaderMachO::instantiateMainExecutable()后继续调用addImage(),将image加入到sAllImages全局镜像列表,并将image映射到申请的内存中。代码如下:
static void addImage(ImageLoader* image)
{
  // add to master list
    allImagesLock();
        sAllImages.push_back(image);
    allImagesUnlock();

  // update mapped ranges
  uintptr_t lastSegStart = 0;
  uintptr_t lastSegEnd = 0;
  for(unsigned int i=0, e=image->segmentCount(); i < e; ++i) {
    if ( image->segUnaccessible(i) )
      continue;
    uintptr_t start = image->segActualLoadAddress(i);
    uintptr_t end = image->segActualEndAddress(i);
    if ( start == lastSegEnd ) {
      // two segments are contiguous, just record combined segments
      lastSegEnd = end;
    }
    else {
      // non-contiguous segments, record last (if any)
      if ( lastSegEnd != 0 )
        addMappedRange(image, lastSegStart, lastSegEnd);
      lastSegStart = start;
      lastSegEnd = end;
    }
  }
  if ( lastSegEnd != 0 )
    addMappedRange(image, lastSegStart, lastSegEnd);

  if ( gLinkContext.verboseLoading || (sEnv.DYLD_PRINT_LIBRARIES_POST_LAUNCH && (sMainExecutable!=NULL) && sMainExecutable->isLinked()) ) {
    dyld::log("dyld: loaded: %s\n", image->getPath());
  }

}
至此,初始化主程序这一步就完成了。ImageLoaderMachOClassic::instantiateMainExecutable()函数的实现,同理可推,此处不再详述。
加载插入的动态库
这一步是加载环境变量DYLD_INSERT_LIBRARIES中配置的动态库,先判断环境变量DYLD_INSERT_LIBRARIES中是否存在要加载的动态库,如果存在则调用loadInsertedDylib()依次加载,代码如下:
if  ( sEnv.DYLD_INSERT_LIBRARIES != NULL ) {
  for (const char* const* lib = sEnv.DYLD_INSERT_LIBRARIES; *lib != NULL; ++lib)
    loadInsertedDylib(*lib);
}
loadInsertedDylib()内部设置了一个LoadContext参数后,调用了load()函数,
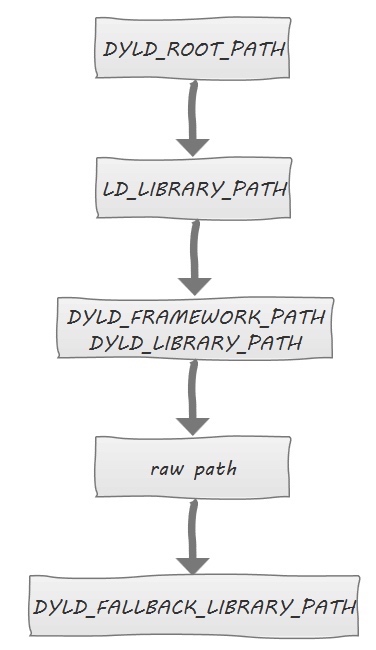
load()函数的实现为一系列的loadPhase*()函数,loadPhase0()~loadPhase1()函数会按照下图所示顺序搜索动态库,并调用不同的函数来继续处理。

当内部调用到loadPhase5load()函数的时候,会先在共享缓存中搜寻,如果存在则使用ImageLoaderMachO::instantiateFromCache()来实例化ImageLoader,否则通过loadPhase5open()打开文件并读取数据到内存后,再调用loadPhase6(),通过ImageLoaderMachO::instantiateFromFile()实例化ImageLoader,最后调用checkandAddImage()验证镜像并将其加入到全局镜像列表中。
load()函数代码如下:
ImageLoader* load(const char* path, const LoadContext& context, unsigned& cacheIndex)
{
    ...

    // try all path permutations and check against existing loaded images

    ImageLoader* image = loadPhase0(path, orgPath, context, cacheIndex, NULL);
    if ( image != NULL ) {
        CRSetCrashLogMessage2(NULL);
        return image;
    }

    // try all path permutations and try open() until first success
    std::vector<const char*> exceptions;
    image = loadPhase0(path, orgPath, context, cacheIndex, &exceptions);
#if !TARGET_IPHONE_SIMULATOR
    // <rdar://problem/16704628> support symlinks on disk to a path in dyld shared cache
    if ( image == NULL)
        image = loadPhase2cache(path, orgPath, context, cacheIndex, &exceptions);
#endif
    ...
}
链接主程序
这一步调用link()函数将实例化后的主程序进行动态修正,让二进制变为可正常执行的状态。link()函数内部调用了ImageLoader::link()函数,从源代码可以看到,这一步主要做了以下几个事情:
- recursiveLoadLibraries() 根据LC_LOAD_DYLIB加载命令把所有依赖库加载进内存。
- recursiveUpdateDepth() 递归刷新依赖库的层级。
- recursiveRebase() 由于ASLR的存在,必须递归对主程序以及依赖库进行重定位操作。
- recursiveBind() 把主程序二进制和依赖进来的动态库全部执行符号表绑定。
- weakBind() 如果链接的不是主程序二进制的话,会在此时执行弱符号绑定,主程序二进制则在link()完后再执行弱符号绑定,后面会进行分析。
recursiveGetDOFSections()、context.registerDOFs() 注册DOF(DTrace Object Format)节。
ImageLoader::link()源代码如下:void ImageLoader::link(const LinkContext& context, bool forceLazysBound, bool preflightOnly, bool neverUnload, const RPathChain& loaderRPaths, const char* imagePath) {
...
uint64_t t0 = mach_absolute_time();
// 递归加载加载主程序所需依赖库
this->recursiveLoadLibraries(context, preflightOnly, loaderRPaths, imagePath);
...
uint64_t t1 = mach_absolute_time();
context.clearAllDepths();
// 递归刷新依赖库的层级
this->recursiveUpdateDepth(context.imageCount());
uint64_t t2 = mach_absolute_time();
// 递归进行rebase
this->recursiveRebase(context);
uint64_t t3 = mach_absolute_time();
// 递归绑定符号表
this->recursiveBind(context, forceLazysBound, neverUnload);
uint64_t t4 = mach_absolute_time();
if ( !context.linkingMainExecutable )
// 弱符号绑定
this->weakBind(context);
uint64_t t5 = mach_absolute_time();
context.notifyBatch(dyld_image_state_bound, false);
uint64_t t6 = mach_absolute_time();
std::vector<DOFInfo> dofs;
// 注册DOF节
this->recursiveGetDOFSections(context, dofs);
context.registerDOFs(dofs);
uint64_t t7 = mach_absolute_time();
...
}
链接插入的动态库
这一步与链接主程序一样,将前面调用addImage()函数保存在sAllImages中的动态库列表循环取出并调用link()进行链接,需要注意的是,sAllImages中保存的第一项是主程序的镜像,所以要从i+1的位置开始,取到的才是动态库的ImageLoader:
ImageLoader* image = sAllImages[i+1];
接下来循环调用每个镜像的registerInterposing()函数,该函数会遍历Mach-O的LC_SEGMENT_COMMAND加载命令,读取__DATA,__interpose,并将读取到的信息保存到fgInterposingTuples中,接着调用applyInterposing()函数,内部经由doInterpose()虚函数进行替换操作,以ImageLoaderMachOCompressed::doInterpose()函数的实现为例:该函数内部调用了eachBind()与eachLazyBind(),具体处理函数是interposeAt(),该函数调用interposedAddress()在fgInterposingTuples中查找需要替换的符号地址,进行最终的符号地址替换,代码如下:
void ImageLoaderMachOCompressed::doInterpose(const LinkContext& context)
{
    // update prebound symbols
    eachBind(context, &ImageLoaderMachOCompressed::interposeAt);
    eachLazyBind(context, &ImageLoaderMachOCompressed::interposeAt);
}

uintptr_t ImageLoaderMachOCompressed::interposeAt(const LinkContext& context, uintptr_t addr, uint8_t type, const char*,
                                                uint8_t, intptr_t, long, const char*, LastLookup*, bool runResolver)
{
    if ( type == BIND_TYPE_POINTER ) {
        uintptr_t* fixupLocation = (uintptr_t*)addr;
        uintptr_t curValue = *fixupLocation;
        uintptr_t newValue = interposedAddress(context, curValue, this);
        if ( newValue != curValue) {
            *fixupLocation = newValue;
        }
    }
    return 0;
}
执行弱符号绑定
weakBind()首先通过getCoalescedImages()合并所有动态库的弱符号到一个列表里,然后调用initializeCoalIterator()对需要绑定的弱符号进行排序,接着调用incrementCoalIterator()读取dyld_info_command结构的weak_bind_off和weak_bind_size字段,确定弱符号的数据偏移与大小,最终进行弱符号绑定,代码如下:
bool ImageLoaderMachOCompressed::incrementCoalIterator(CoalIterator& it)
{
    if ( it.done )
        return false;

    if ( this->fDyldInfo->weak_bind_size == 0 ) {
        /// hmmm, ld set MH_WEAK_DEFINES or MH_BINDS_TO_WEAK, but there is no weak binding info
        it.done = true;
        it.symbolName = "~~~";
        return true;
    }
    const uint8_t* start = fLinkEditBase + fDyldInfo->weak_bind_off;
    const uint8_t* p = start + it.curIndex;
    const uint8_t* end = fLinkEditBase + fDyldInfo->weak_bind_off + this->fDyldInfo->weak_bind_size;
    uintptr_t count;
    uintptr_t skip;
    uintptr_t segOffset;
    while ( p < end ) {
        uint8_t immediate = *p & BIND_IMMEDIATE_MASK;
        uint8_t opcode = *p & BIND_OPCODE_MASK;
        ++p;
        switch (opcode) {
            case BIND_OPCODE_DONE:
                it.done = true;
                it.curIndex = p - start;
                it.symbolName = "~~~"; // sorts to end
                return true;
        }
        break;
        ...
    }
    ...
    return true;
}
执行初始化方法
这一步由initializeMainExecutable()完成。dyld会优先初始化动态库,然后初始化主程序。该函数首先执行runInitializers(),内部再依次调用processInitializers()、recursiveInitialization()。我们在recursiveInitialization()函数里找到了notifySingle()函数:
context.notifySingle(dyld_image_state_dependents_initialized, this, &timingInfo);
接着跟进notifySingle函数,看到下面处理代码:
if ( (state == dyld_image_state_dependents_initialized) && (sNotifyObjCInit != NULL) && image->notifyObjC() ) {
    uint64_t t0 = mach_absolute_time();
    (*sNotifyObjCInit)(image->getRealPath(), image->machHeader());
    uint64_t t1 = mach_absolute_time();
    uint64_t t2 = mach_absolute_time();
    uint64_t timeInObjC = t1-t0;
    uint64_t emptyTime = (t2-t1)*100;
    if ( (timeInObjC > emptyTime) && (timingInfo != NULL) ) {
        timingInfo->addTime(image->getShortName(), timeInObjC);
    }
}
我们关心的只有sNotifyObjCInit这个回调,继续寻找赋值的地方:
void registerObjCNotifiers(_dyld_objc_notify_mapped mapped, _dyld_objc_notify_init init, _dyld_objc_notify_unmapped unmapped)
{
    // record functions to call
    sNotifyObjCMapped   = mapped;
    sNotifyObjCInit     = init;
    sNotifyObjCUnmapped = unmapped;
    ...
再接着找registerObjCNotifiers函数调用,最终找到这里:
void _dyld_objc_notify_register(_dyld_objc_notify_mapped    mapped,
                                _dyld_objc_notify_init      init,
                                _dyld_objc_notify_unmapped  unmapped)
{
    dyld::registerObjCNotifiers(mapped, init, unmapped);
}
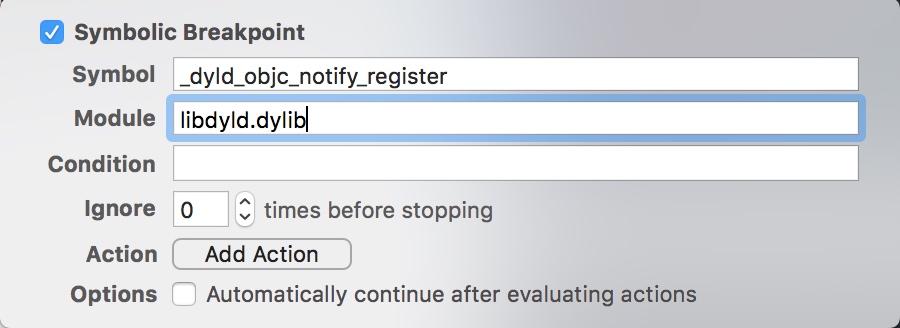
那么到底谁调用了_dyld_objc_notify_register()呢?静态分析已经无法得知,只能对_dyld_objc_notify_register()下个符号断点观察一下了,
点击Xcode的“Debug”菜单,然后点击“Breakpoints”,接着选择“Create Symbolic Breakpoint...”。如下图所示。
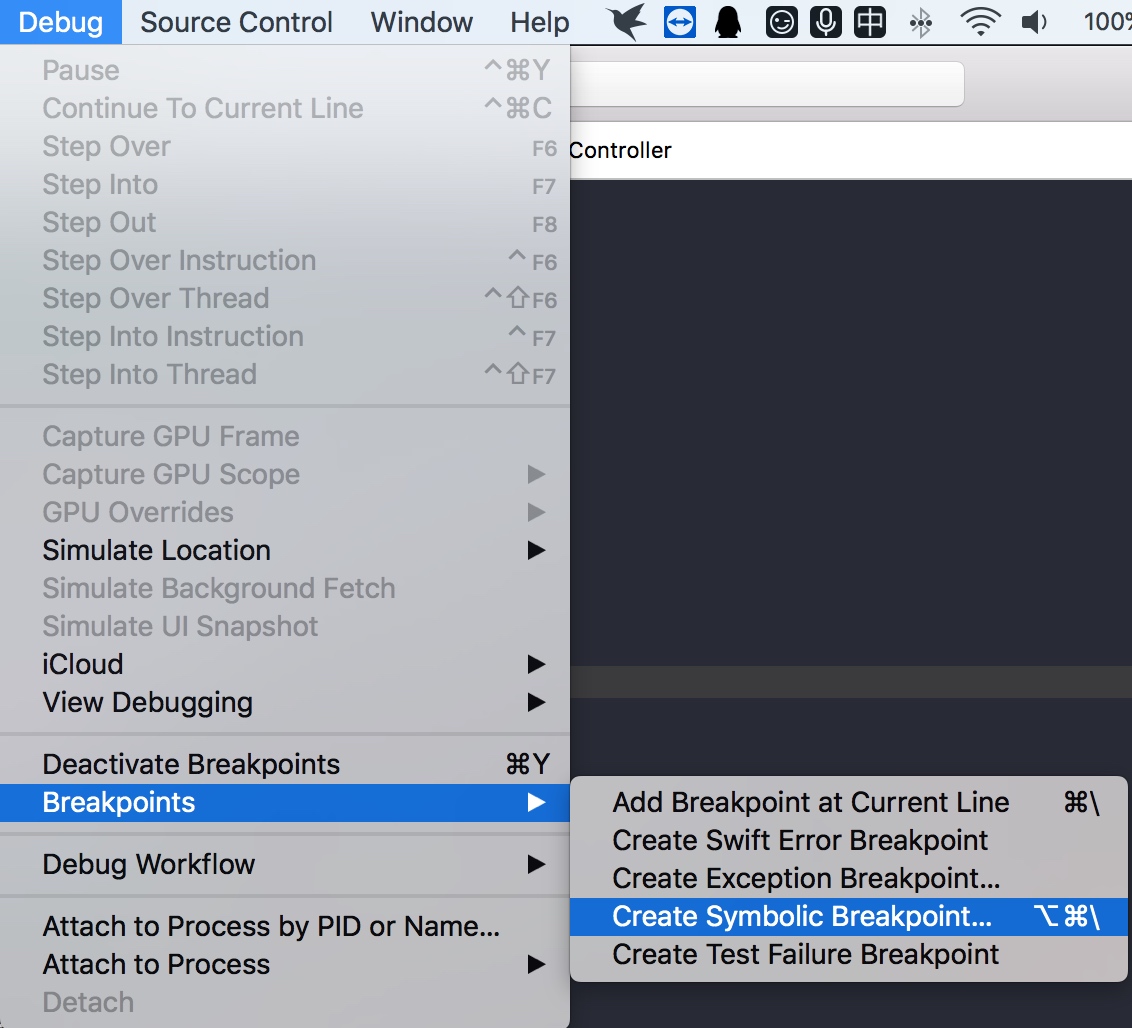 

在弹出的对话框中设置_dyld_objc_notify_register()符号断点,按下图所示。

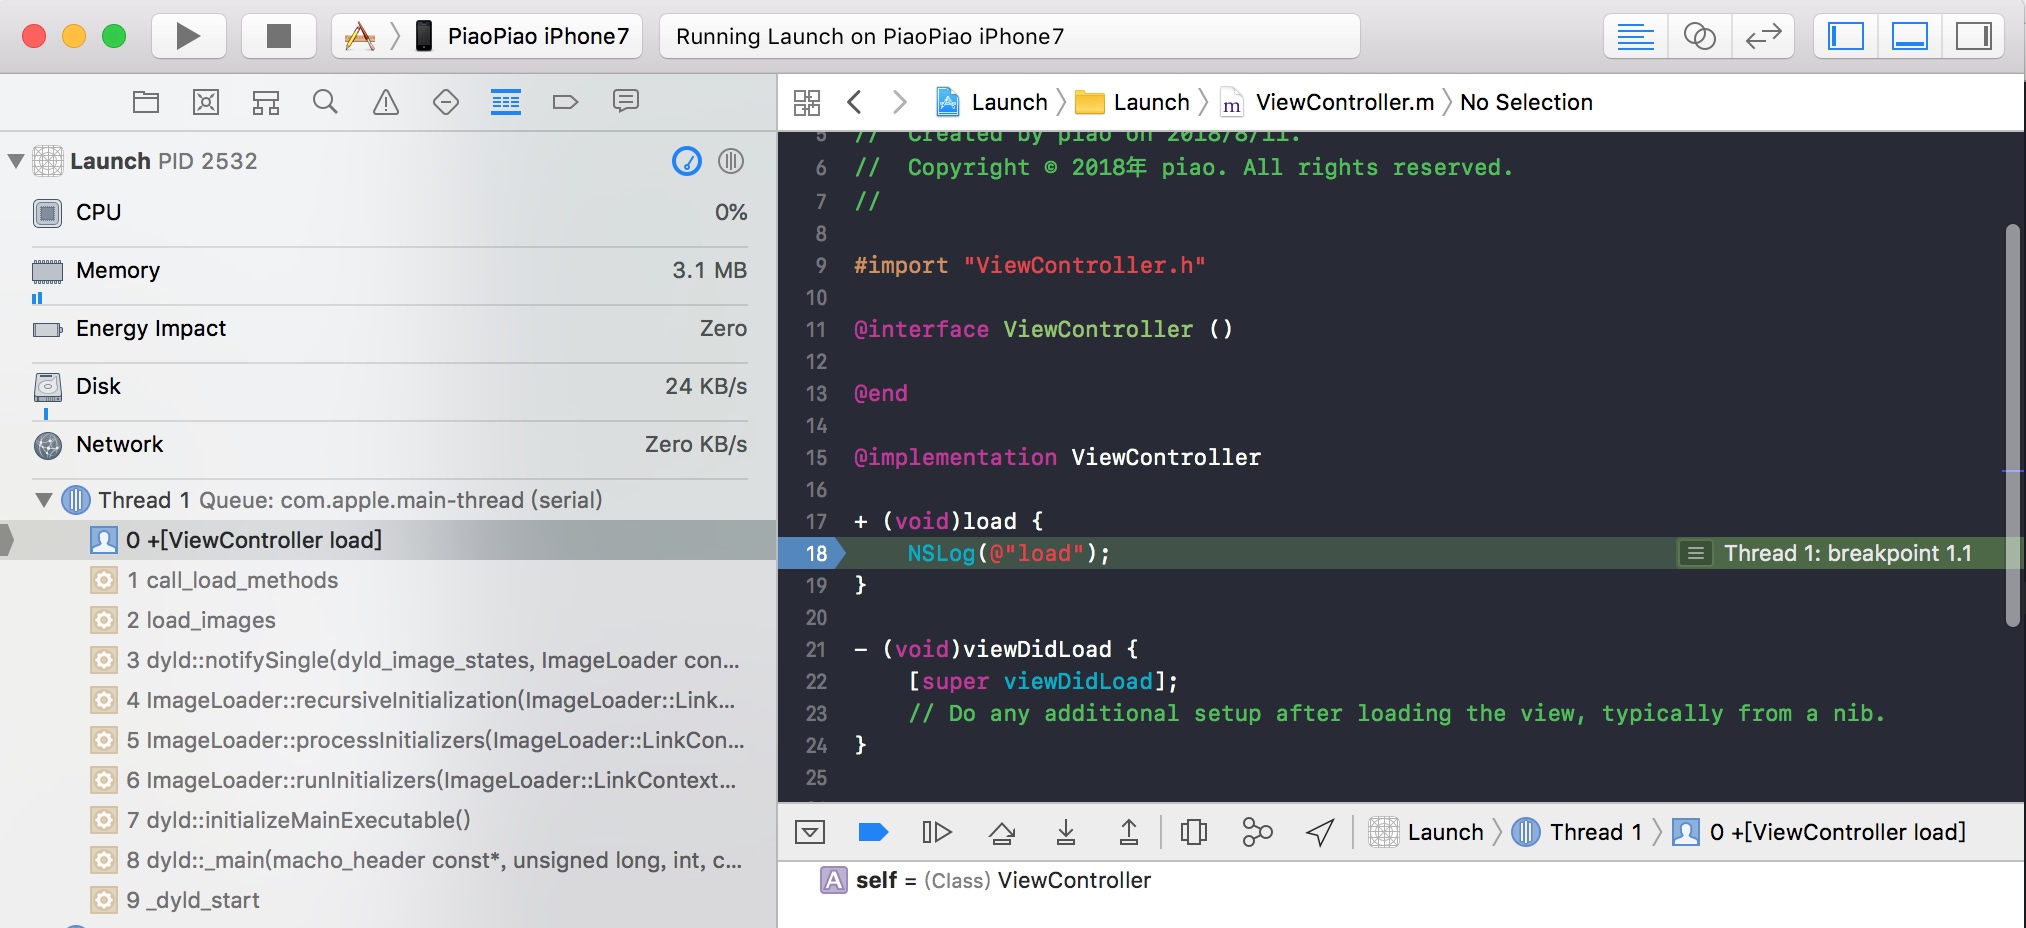
运行程序,成功命中断点,从调用栈看到是libobjc.A.dylib的_objc_init函数调用了_dyld_objc_notify_register()。如下图所示。
 

到https://opensource.apple.com/tarballs/objc4/下载objc源代码,找到_objc_init函数:
/***********************************************************************
* _objc_init
* Bootstrap initialization. Registers our image notifier with dyld.
* Called by libSystem BEFORE library initialization time
**********************************************************************/

void _objc_init(void)
{
    static bool initialized = false;
    if (initialized) return;
    initialized = true;

    // fixme defer initialization until an objc-using image is found?
    environ_init();
    tls_init();
    static_init();
    lock_init();
    exception_init();

    _dyld_objc_notify_register(&map_images, load_images, unmap_image);
}
这里注册的init回调函数就是load_images(),回调里面调用了call_load_methods()来执行所有的+ load方法。现在修改一下工程源码,加入以下代码并下断点即可看到调用栈:
+ (void)load {
    NSLog(@"load");
}

notifySingle()之后就是调用doInitialization(),代码如下:
// initialize this image
// 调用constructor()
bool hasInitializers = this->doInitialization(context);
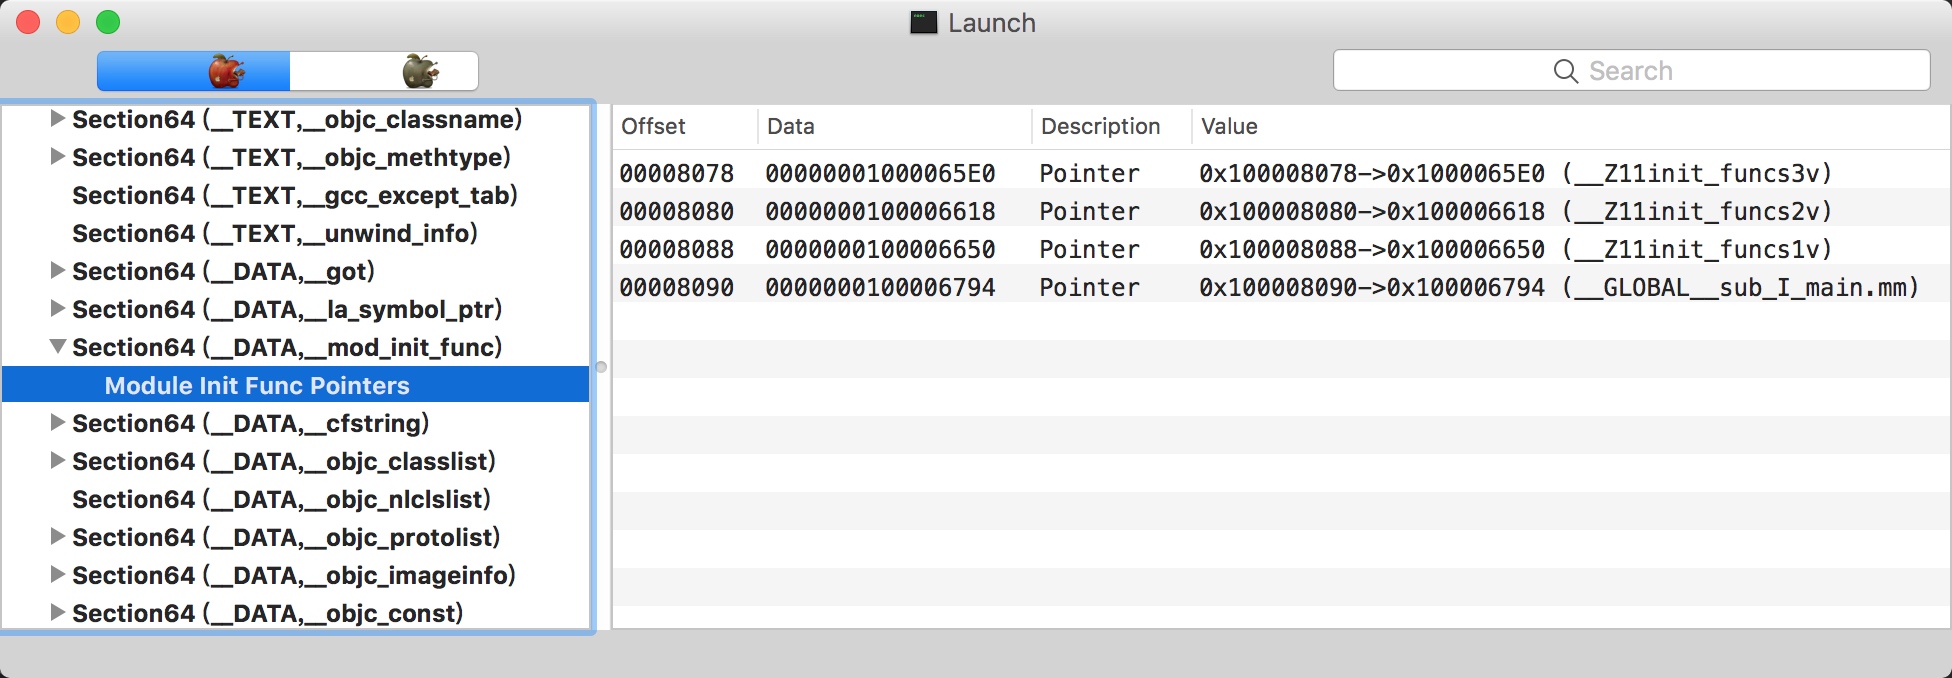
doInitialization()内部首先调用doImageInit来执行镜像的初始化函数,也就是LC_ROUTINES_COMMAND中记录的函数,然后再执行doModInitFunctions()方法来解析并执行_DATA_,__mod_init_func这个section中保存的函数,如下图所示。
_mod_init_funcs中保存的是全局C++对象的构造函数以及所有带__attribute__((constructor)的C函数。

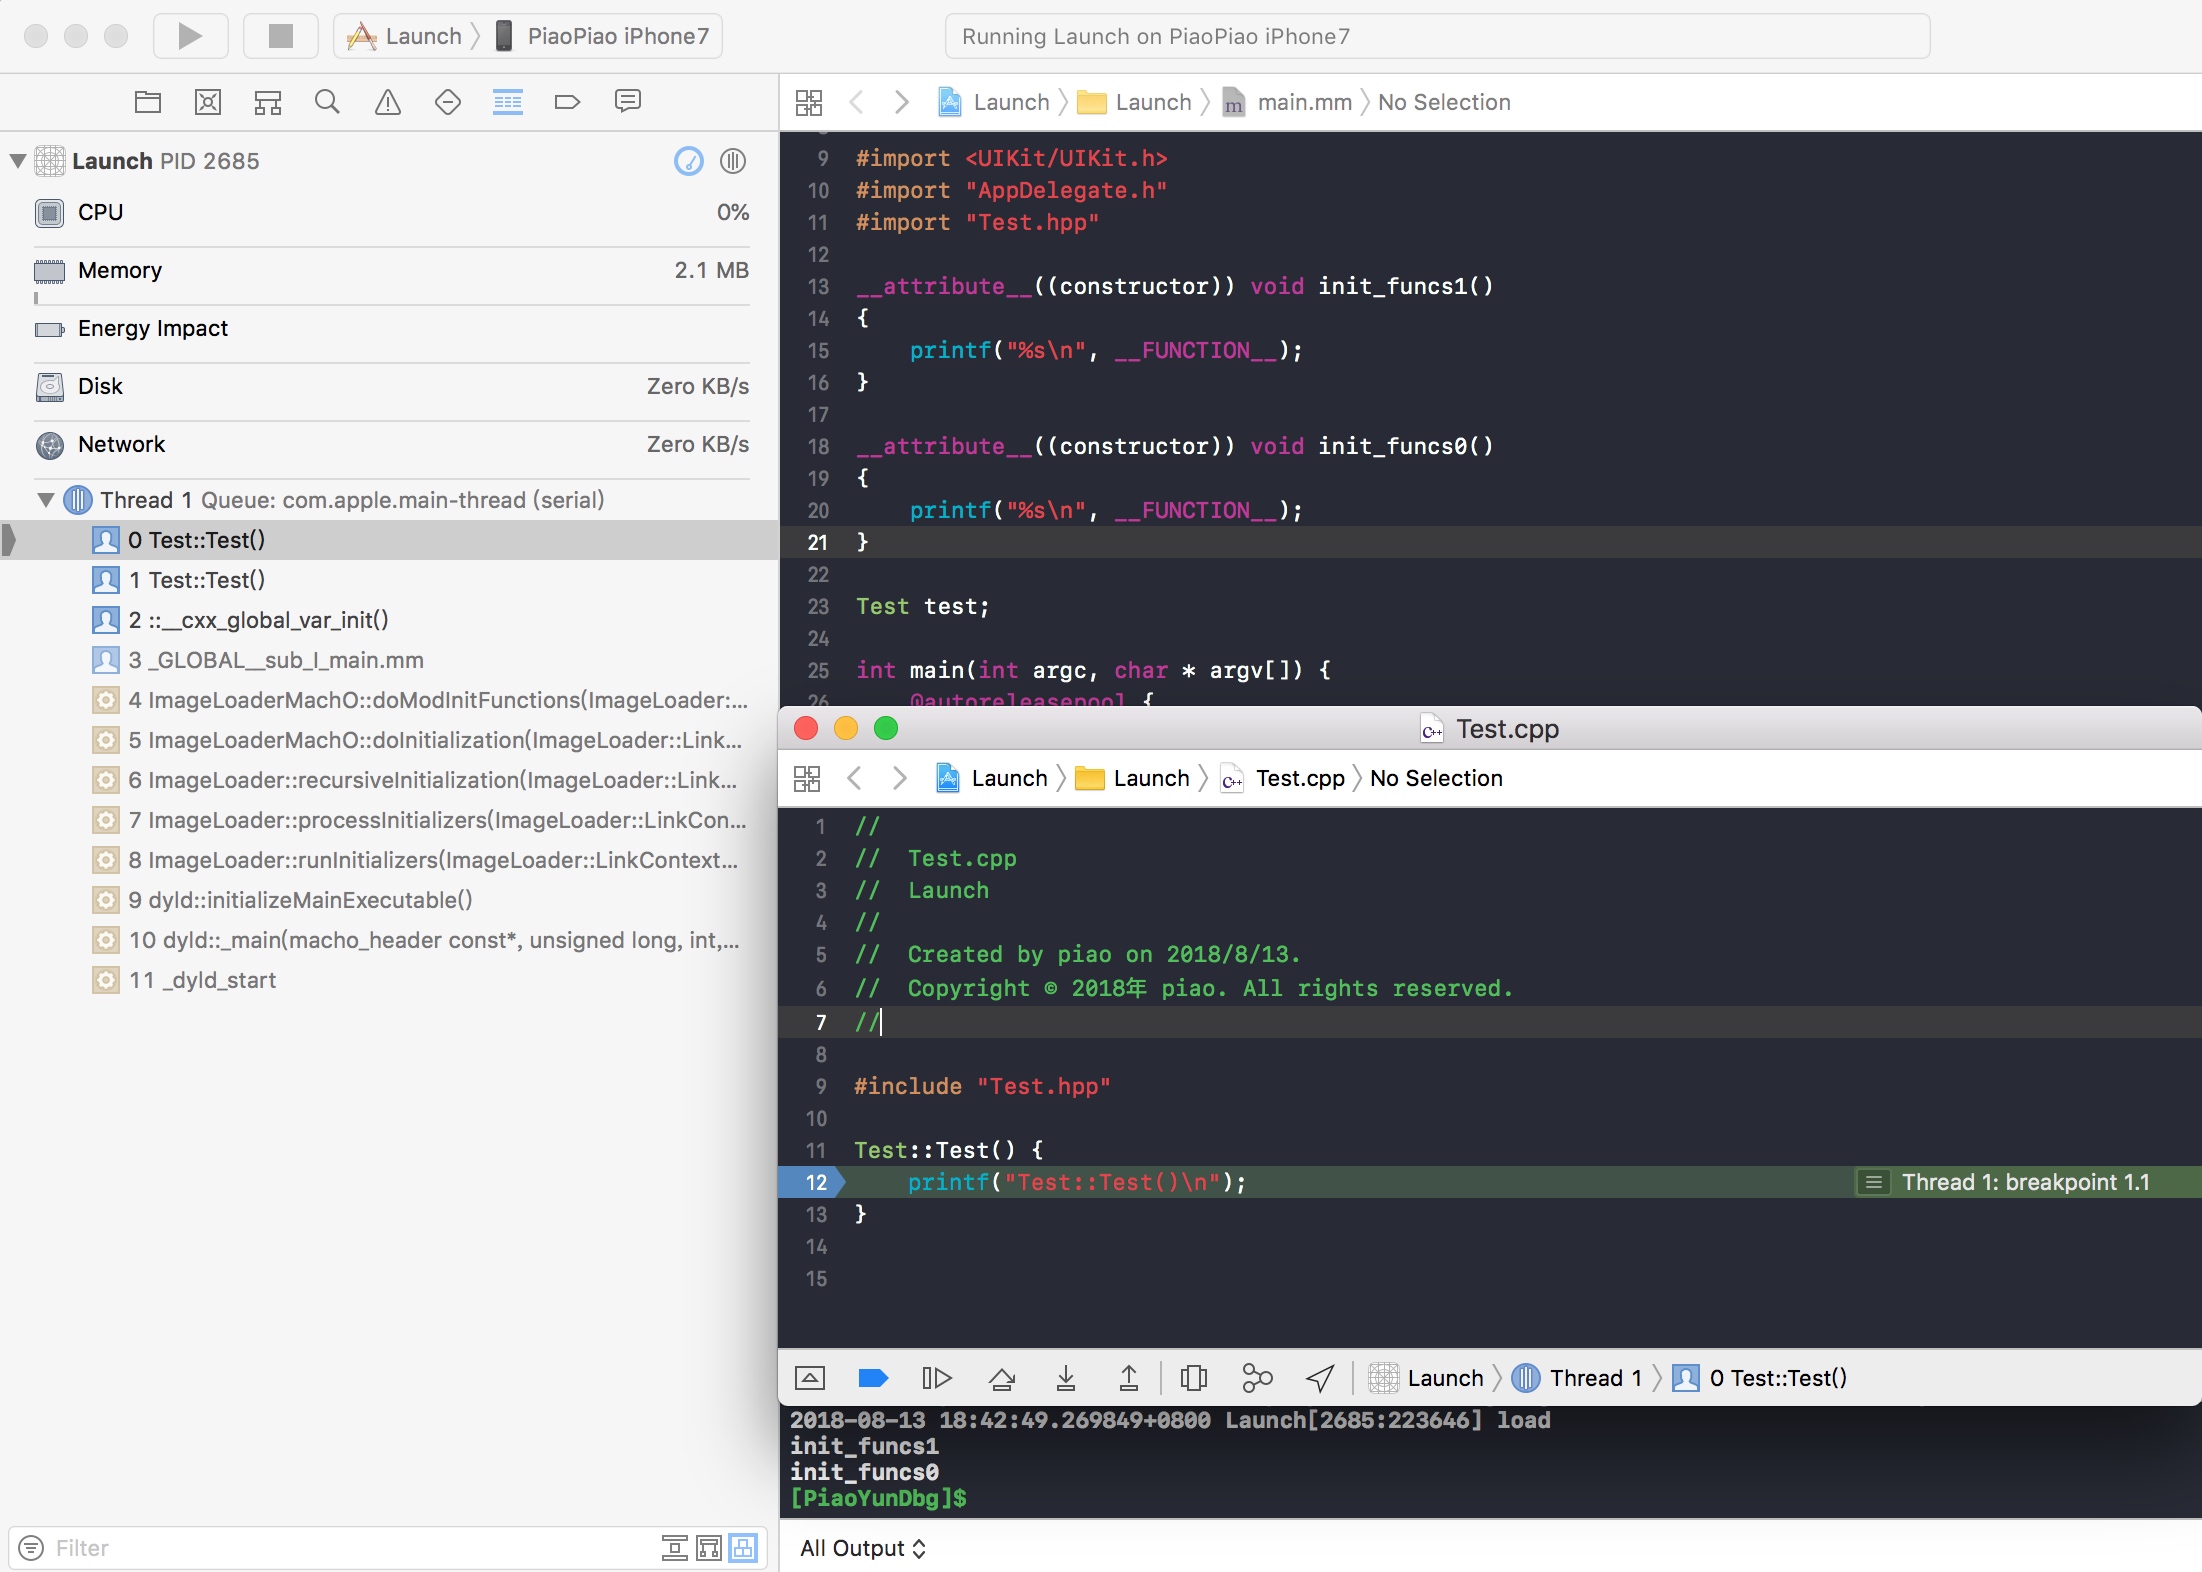
现在添加一些代码再来运行一下程序即可验证,如下图所示。

查找入口点并返回
这一步调用主程序镜像的getThreadPC(),从加载命令读取LC_MAIN入口,如果没有LC_MAIN就调用getMain()读取LC_UNIXTHREAD,找到后就跳到入口点指定的地址并返回。
至此,整个dyld的加载过程就分析完成了。

已有903位网友发表了看法:
刚才的图片链接被屏蔽, 在发一下
36行位置: 提示: Unknown register name '%x20' in asm
是什么原因, 如何改
发表评论